October Project Shares*
October Project Shares
And as any child can tell you, there's a certain magic that comes with the very first snow, especially when it falls on the day before Christmas.
-Narrator, Frosty the Snowman ☃️
Let's create together....
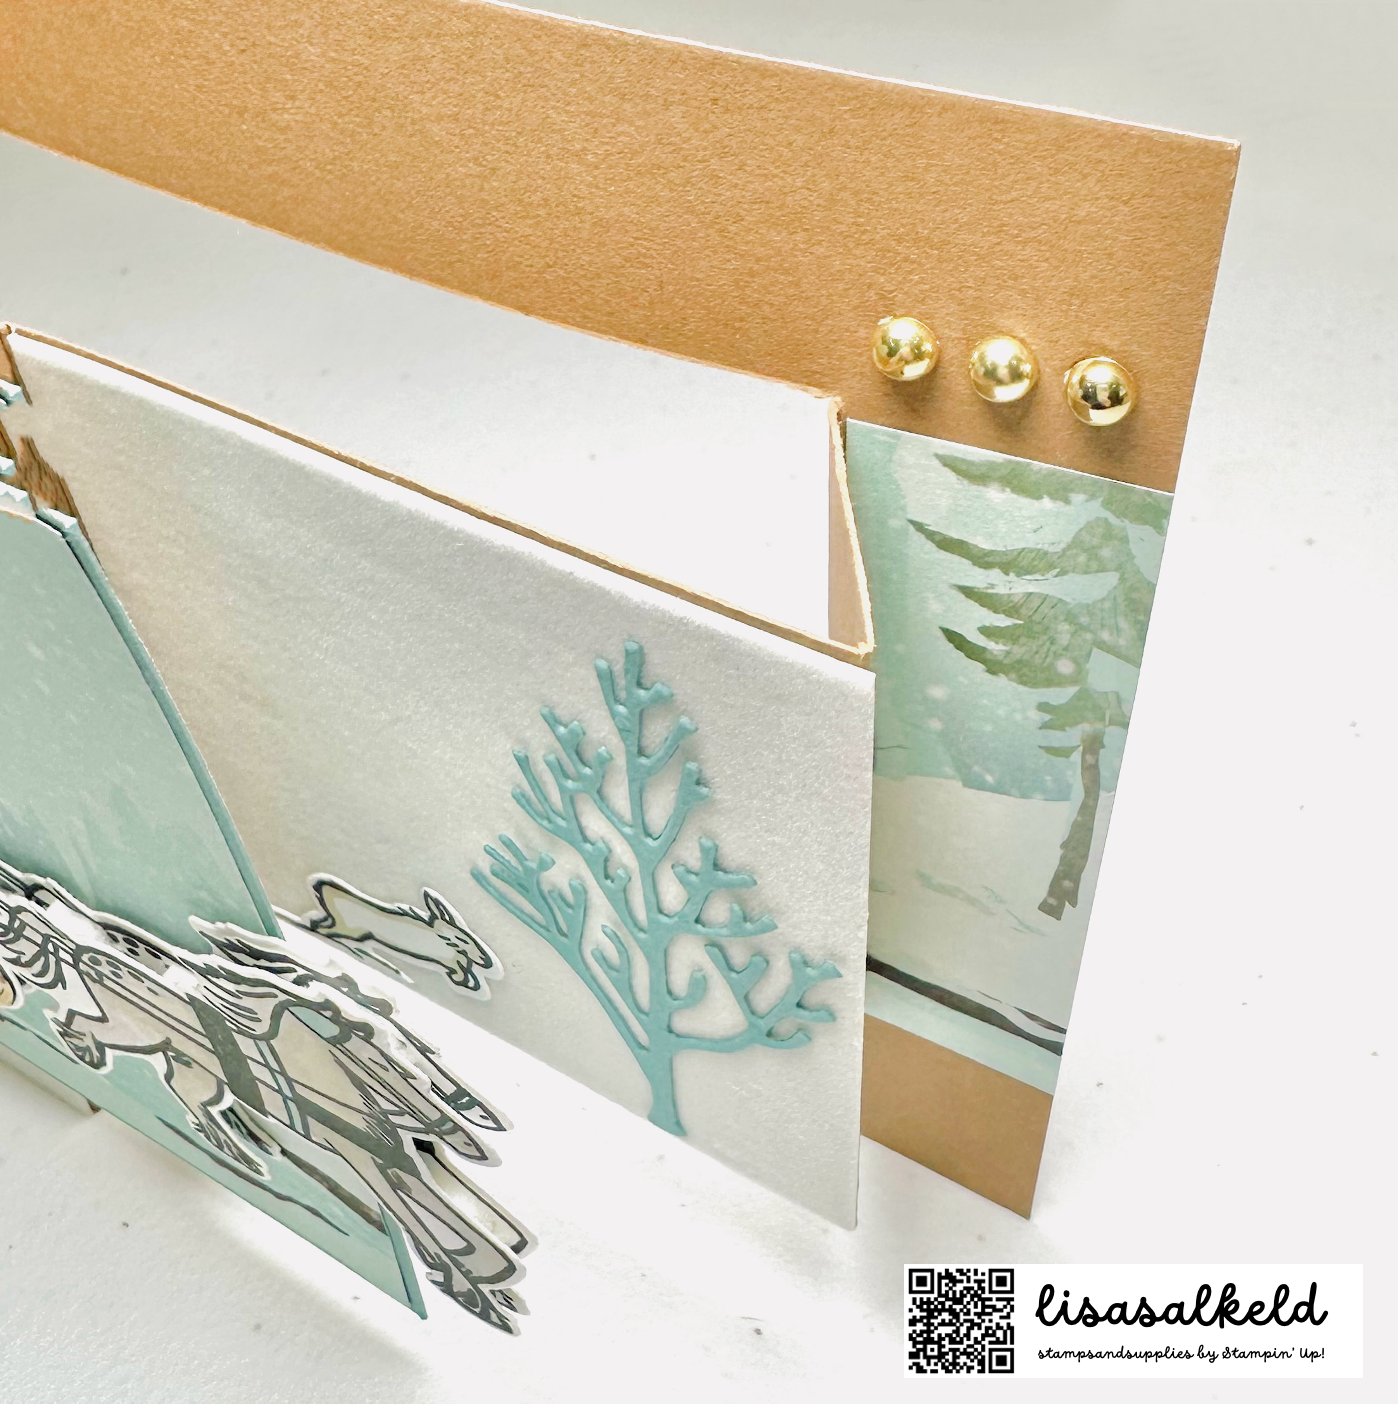
First, let's do a creatively folded card in a slightly larger size. This card is great for display and shows off your favorite stamps, dies, and papers.
October 2023
№ 1. Horse & Sleigh✧
https://stampyandscrappy.blogspot.com
Finished card is 6 x 5
Special Note: This card fits a 5 x 7 envelope

What you'll need
Stamp: BUNDLE Horse & Sleigh 162126
Paper: [cardstock] Pecan Pie, Lost Lagoon [design papers] One Horse Open Sleigh 162118; Gold Foil 132622, white specialty paper
Ink: Memento Black; Blends alcohol markers
Et cetera: [punches] Happy Labels 160693 [embellishments] Blooming Pearls 162238
Surplus❀
Color Coordination: Blends alcohol markers
Light: Gray Granite, Crumb Cake, Lost Lagoon, Soft Sea Foam
Color Coordination: cardstock and papers
Lost Lagoon, Crumb Cake, Gray Granite, Pecan Pie, Soft Sea Foam, gold

Measurements and instructions
Basic Concertina Shutter card:
Cut card stock to 10 x 5
10 across the top, score at 5
5 across top, left edge at 1
Using measurements in the blade guide, cut from 1 to 7
Repeat on the opposite side
10 across top
Score in center section only at 1, 2, 6
Score top and bottom margin at 7
With the largest rectangle section in your left hand, the center section folds left to right are as follows:
Mountain : Valley : Mountain : Valley
Use bone folder to crease edges flat
Size of finished card blank is approximately 6 x 5 and fits a 5 x 7 envelope
Cover panel: 4-1/4 square cut of card stock layered with a 4-1/8 piece of design paper
Left rectangle section: 3 x 5
Middle square section: 3 x 3
Right partial section: 1 x 3

Twinkle Tip✧
Use self-standing cards with creative folds to display favorite stamps, dies, and papers
Create these project shares with your favorite stamps, dies, and papers. I feature Stampin’ Up! products in my crafting and creating. Should you need a specific item, links to my online store and select items are provided below. Products are current at time of posting. For similar or additional supplies please visit https://lisasalkeld.stampinup.net >shop now
Bundle – Horse & Sleigh
https://www.stampinup.com/products/horse-sleigh-bundle-english?dbwsdemoid=2048063
Papers – One Horse Open Sleigh
Papers - Gold Foil
https://www.stampinup.com/products/foil-sheets-gold?dbwsdemoid=2048063
Punch – Label
https://www.stampinup.com/products/happy-labels-pick-a-punch?dbwsdemoid=2048063
Embellishments –Pearls
https://www.stampinup.com/products/blooming-pearls?dbwsdemoid=2048063


Stamp: Winter Owls 162153
Paper: [cardstock] Starry Sky, white [design papers] Winter Meadow 162133
Ink: Starry Sky
Et cetera: [embossing folder] Snowflake Sky 162026
[punches] 2-3/8 Circle 161354 [embellishments] Blooming Pearls 162238
Surplus❀ 2-1/2 Circle Punch: Circle punch sizes available now include:
1-3/4, 2, and 2-3/8

Measurements and instructions
Card blank finished size: 4-1/4 x 5-1/2 & design paper: 4 x 5-1/4
Card stock panel: 3 x 4-1/4 & design paper: 2-3/4 x 4
Circle punches: 2-3/8 & 2-1/2
Create your card blank by scoring an 8-1/2 x 5-1/2 sheet of card stock in half at 4-1/4 and folding on the left side.
Add a 4 x 5-1/4 panel of design paper. To add texture, use design paper with your favorite embossing folder. Here I used the Snowflake Sky embossing folder.
Add an additional layer with a 3 x 4-1/4 cut of card stock layered with a 2-3/4 x 4 piece of design paper.
For a sentiment, punch a 2-1/2 circle from cardstock and layer it with a 2-3/8 circle that includes a stamped sentiment.
Add your favorite embellishments.
Twinkle Tip✧
This is a stash-busting design, use the papers you find in your craft space!
Need anything? Create these project shares with your favorite stamps, dies, and papers. I feature Stampin’ Up! products in my crafting and creating. Should you need a specific item, links to my online store and select items are provided below. Products are current at time of posting. For similar or additional supplies please visit https://lisasalkeld.stampinup.net >shop now
Stamp – Winter Owls
https://www.stampinup.com/products/winter-owls-cling-stamp-set-english?dbwsdemoid=2048063
Papers – Winter Meadow
Punch – 2-3/8 Circle
https://www.stampinup.com/products/2-3-8-6-cm-circle-punch?dbwsdemoid=2048063
Finally, we'll practice our watercoloring with this sweet, not stinky, cheerful critter card...
№ 3. Feel Better Soon✧
https://stampyandscrappy.blogspot.com
Finished card is 4-1/4 x 5-1/2

What you’ll need
Stamp: Best Remedy Kit 160171
Paper: [cardstock] Bubble Bath, Pool Party, white
Ink: Memento Black, Smoky Slate
Et cetera: [punches] Happy Labels 160693; glitter brush 141897;
[embellishments] Blooming Pearls 162238; silicone craft sheet 127853
Surplus❀ small water bottle
Color Coordination: Blends alcohol markers
Light: Smoky Slate, Granny Apple Green
Light & Dark: Bubble Bath
Measurements and instructions
Card blank: 8-1/2 x 5-1/2 folded to 4-1/4 x 5-1/2
Design paper is card blank provided in kit cut down to 4 x 5-1/4
Embossed panel: 2 x4
Cover panel: 3-1/4 square cut of card stock layered with a 3-inch square stamped panel
Stamp sentiment on a 1/2-inch thick piece of white card stock. Finish the ends with your favorite label punch
-Lisa (✿◠‿◠)
Create these project shares with your favorite stamps, dies, and papers. I feature Stampin’ Up! products in my crafting and creating. Should you need a specific item, links to my online store and select items are provided below. Products are current at time of posting. For similar or additional supplies please visit https://lisasalkeld.stampinup.net >shop now
Kit – Best Remedy
https://www.stampinup.com/products/the-best-remedy-kit-english?dbwsdemoid=2048063
Glitter brush
https://www.stampinup.com/products/wink-of-stella-clear-glitter-brush?dbwsdemoid=2048063
Punch – Label
https://www.stampinup.com/products/happy-labels-pick-a-punch?dbwsdemoid=2048063
Embellishments –Pearls
https://www.stampinup.com/products/blooming-pearls?dbwsdemoid=2048063

Lisa ⎹ Maker + Papercrafter
Specializing in handmade greeting cards
Join me for step-by-step instruction through all the
creative folds, techniques, and tutorials
Stampin’ Up! Demonstrator 14 years ⎹ $100,000 Sales Achiever
Lifetime Crafter
Blog: https://stampyandscrappy.blogspot.com
Shop 24▸7: https://lisasalkeld.stampinup.net
Oklahoma Stamp Club: https://www.facebook.com/okstampclub
Email: lisasalkeld@gmail.com


Printables available at lisasalkeld.stampinup.net >My Projects
create today (◡‿◡✧)


Comments
Post a Comment
It's awesome you're here. Thank you for visiting Stampy and Scrappy! (✿◠‿◠)❤