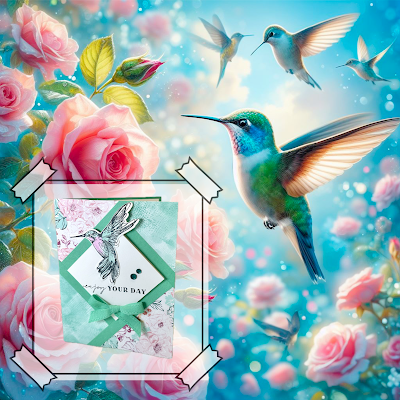
A Fractured Card Design*
APRIL PROJECT SHARE*
Fractured or Faux Shutter Design 📷
Printables for Project Shares are available here: Project Shares
𝒩𝑒𝒾𝓉𝒽𝑒𝓇 𝒽𝓊𝓂𝓂𝒾𝓃𝑔𝒷𝒾𝓇𝒹𝓈 𝓃𝑜𝓇 𝒻𝓁𝑜𝓌𝑒𝓇𝓈 𝓌𝑜𝓃𝒹𝑒𝓇 𝒶𝒷𝑜𝓊𝓉 𝓉𝒽𝑒𝒾𝓇 𝒷𝑒𝒶𝓊𝓉𝓎~
This hummingbird, stamped straight from the heart, brings the beauty of the garden to your handmade projects. Customize with vivid color and an easier-than-it-looks layout to bring this little garden fairy to life.
Enjoy this project share,
-Lisa (✿◠‿◠)
Let’s create this brightly blooming card using the fractured or faux shutter design technique…
Oklahoma Stamp Club | Featured Artist: Lisa |
No. 1 Fractured or Faux Shutter Card | April 2024 |
https://stampyandscrappy.blogspot.com Finished card is A2, 4-1/4 x 5-1/2 Stamp: [hummingbird + sentiment] Thoughtful Expressions 162815 Paper: [design papers] Unbounded Beauty 163372 [card stock] Shy Shamrock, white Et cetera Wink of Stella 141897, [ribbon] Shy Shamrock Bordered Ribbon 163787 [embellishments] Adhesive Backed Sequins Trio 161206 Surplus❀ Color Coordination: card stock and papers: White, Shy Shamrock, and [design papers] Unbounded Beauty rainbow: Berry Burst, Petunia Pop, Calypso Coral, Pretty in Pink, Peach Pie, Shy Shamrock, Pretty Peacock, Summer Splash Measurements and directions for a Fracture or Faux Shutter card Finished card is 4-1/4 x 5-1/2 -(1) card blank A2 4-1/4 x 5-1/2 folded on the left, Shy Shamrock -(1) inside writing panel 4 x 5-1/4, white card stock Start with a 4-1/4 x 5-1/2 card panel. Here we are using Shy Shamrock. We will adhere everything to this panel, and then attach this panel to our card blank, also Shy Shamrock. Place a 2-1/2 square of white card stock where you would like your “faux shutter” to appear, glue directly to panel. A template is provided. The remaining pieces for this project use this square as a starting point. Next, add the (4) 2 x 4-1/4 design papers. Start in the upper-right quadrant and move clockwise. The template has written notes to assist placement. Adhere each design paper adjacent to and touching each edge of the white square cardstock. Match the top-left corner of the design paper to the top-right corner of the square each time. The other end of the paper will hang off the edge of the card panel. Turn card as needed. Add (4) 3/8 strips of coordinating card stock in the same manner, starting with the upper- right quadrant and moving clockwise. One end of the strip should be flush with the design paper, the other will hang off the edge of the card panel. For this project, the strips are adhered adjacent to the white square and over the design papers. To me, this resulted in a finished look. Once the design papers and the strips are added, flip your card panel over and trim the excess. Keep in mind, there are various ways to add the papers and strips to this project, do what works for you. Stamp your second square with desired sentiment. Add using dimensionals directly over the first square. For the hummingbird, stamp image with Memento Black ink. Separately, on a glass or rubber mat, or a stampin’ block, add a bit of ink using the 2024-2026 In Color Stampin’ Write markers in Shy Shamrock and Petunia Pop. Using your Wink of Stella brush and little water, color the throat of the hummingbird with Petunia Pop. Clean brush and quickly add color to the rest of the hummingbird with Shy Shamrock. This is a watercolor wash only. No glitter from the glitter brush was added. The entire image does not have color added. This was a brisk few swipes with each color so that the hummingbird coordinated with the design papers. Cut around hummingbird and adhere directly to the stamped white card stock. A touch of ribbon and a couple of adhesive-backed sequins are perfect finishing touches for your project.
Twinkle Tip✧ Maximize your markers. Simply scribble a bit of your Stampin’ Write marker onto an acrylic block or glass mat. Add a few drops of water and, using your favorite glitter brush (without squeezing any glitter!), swipe color over your image. Let dry and add a second color if desired. Don’t worry about coloring inside the lines or choosing colors that feel real-life. Choose colors that match your project. Once dry you have a stamped image that perfectly coordinates with your papercraft project.
Top Hummingbird and embellishments ℂ𝕣𝕖𝕒𝕥𝕖 𝕥𝕙𝕖𝕤𝕖 𝕡𝕣𝕠𝕛𝕖𝕔𝕥 𝕤𝕙𝕒𝕣𝕖𝕤 𝕨𝕚𝕥𝕙 𝕪𝕠𝕦𝕣 𝕗𝕒𝕧𝕠𝕣𝕚𝕥𝕖 𝕤𝕥𝕒𝕞𝕡𝕤, 𝕕𝕚𝕖𝕤, 𝕒𝕟𝕕 𝕡𝕒𝕡𝕖𝕣𝕤. I feature Stampin’ Up! products in my crafting and creating. Should you need a specific item, links to my online store and select items are provided below. Products are current at time of posting. For similar or additional supplies please visit lisasalkeld.stampinup.net >𝕤𝕙𝕠𝕡 𝕟𝕠𝕨
Stamp – Thoughtful Expressions https://www.stampinup.com/products/thoughtful-expressions-cling-stamp-set-english?dbwsdemoid=2048063
Papers – Unbounded Beauty 12x12
Embellishments – Adhesive Backed Sequins : Berry Burst, Pretty Peacock, white https://www.stampinup.com/products/adhesive-backed-sequins-trio?dbwsdemoid=2048063
Glitter brush https://www.stampinup.com/products/wink-of-stella-clear-glitter-brush?dbwsdemoid=2048063
Link to a Splitcoast Stampers gallery featuring Faux Shutter designs Markering your stamps.... 𝐿𝒾𝓈𝒶 ⎹ Maker + Papercrafter Specializing in handmade greeting cards Join me for step-by-step instruction through all the creative folds, techniques, and tutorials Stampin’ Up! Demonstrator 15 years ⎹ $100,000 SALES ACHIEVER Lifetime Crafter
𝐵𝓁❀𝑔: https://stampyandscrappy.blogspot.com Shop 24▸7: https://lisasalkeld.stampinup.net Oklahoma Stamp Club: https://www.facebook.com/okstampclub Email: lisasalkeld@gmail.com 𝚌𝚛𝚎𝚊𝚝𝚎 𝚝𝚘𝚍𝚊𝚢 (っ◔◡◔)っ✨ | |


Comments
Post a Comment
It's awesome you're here. Thank you for visiting Stampy and Scrappy! (✿◠‿◠)❤