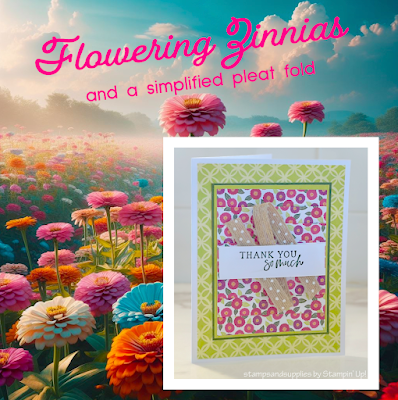
MARCH PROJECT SHARE*
Simplified Pleat Fold
Printables for Project Shares are available here: Download Project Shares
𝕝𝕖𝕥 𝕥𝕙𝕖 𝕘𝕠𝕠𝕕 𝕥𝕙𝕠𝕦𝕘𝕙𝕥𝕤 𝕘𝕣𝕠𝕨
Let your handmade crafts and cards bloom with bountiful zinnias and a simple twist. Here’s a pleat fold design for you to try.
Enjoy the project share,
-Lisa (✿◠‿◠)
Let’s create this zinnia card…
Oklahoma Stamp Club | Featured Artist: Lisa |
No. 1 Simplified Pleat Fold | March 2024 |
https://stampyandscrappy.blogspot.com Finished card is A2, 4-1/4 x 5-1/2
Stamp: [sentiment] Simply Zinnia 163472 Paper: [design papers] Flowering Zinnias 163469 [card stock] Mossy Meadow, Lemon Lime Twist, white Ink: Mossy Meadow Et cetera [ribbon] Natural Polka Dot Trim 163465 Surplus❀ |
In Brief: Pleat fold score lines for 10” width papers 1 | 1-1/2 | 2-1/2 | 3 | 4 | 4-1/2 | 5-1/2 | 6 | 7 | 7-1/2 | 8-1/2 | 9 |
Special note: Begin folding in the center and “mountain-valley” out to each side Color Coordination: card stock and papers: White, Mossy Meadow, Lemon Lime Twist and Flowering Zinnias design papers rainbow: Berry Burst, Melon Mambo, Real Red, Flirty Flamingo, Pumpkin Pie, Petal Pink, Mossy Meadow, Old Olive, Lemon Lime Twist, Lemon Lolly, Highland Heather, Blackberry Bliss |
Measurements and directions for a Simplified Pleat Fold card Finished card is 4-1/4 x 5-1/2 * Create card blank by scoring your 8-1/2 x 5-1/2 card stock in half at 4-1/4. Folded edge is to the left. * Background layer with design paper 4 x 5-1/4 * Largest card stock panel 3-1/4 x 4-1/4 * Smallest card stock panel 3-1/8 x 4-1/8 * Pleated panel Cut your favorite design paper to 10 x 3 and score twelve times, alternating between 1-inch and ½-inch. Specifically, score, fold and burnish at: 1 | 1-1/2 | 2-1/2 | 3 | 4 | 4-1/2 | 5-1/2 | 6 | 7 | 7-1/2 | 8-1/2 | 9 |
When folding, start at the center and work out to each side. Fold in a mountain-valley style until all score lines are folded and burnished. Turn panel so that the 3-inch edge is across the top. Your final panel size should be 3 x 4 with horizontal pleats. As scoring is not always consistent, you may need to carefully trim your final panel down to the 3 x 4 size. The pleated panel should nest perfectly inside the smallest card stock panel measuring 3-1/8 x 4-1/8. Add a light application of glue between folds to close pleats. Do one section at a time and hold for a moment to allow glue to stick. Glue will be needed on both the top and the bottom sides of the panel. * Sentiment: Using ribbon in your designs can be challenging. Make ribbons and trims behave by sandwiching them between two same-shape pieces. Simply tape your ribbon to the bottom piece, add foam dimensionals around the tape, and top with second piece. Stamp your sentiment on your top piece before adhering pieces together. You can use punch or die cut shapes or even cut your own as I did for this sentiment layer. * Inside writing panel, white card stock, 4 x 5-1/4 
Stack layers bottom to top: Background paper ・ Nested card stock panels ・ Pleated panel ・ Sentiment stack Twinkle Tip✧ When creating pleat folds, burnish middle score lines first, working out to each edge.
|
ℂ𝕣𝕖𝕒𝕥𝕖 𝕥𝕙𝕖𝕤𝕖 𝕡𝕣𝕠𝕛𝕖𝕔𝕥 𝕤𝕙𝕒𝕣𝕖𝕤 𝕨𝕚𝕥𝕙 𝕪𝕠𝕦𝕣 𝕗𝕒𝕧𝕠𝕣𝕚𝕥𝕖 𝕤𝕥𝕒𝕞𝕡𝕤, 𝕕𝕚𝕖𝕤, 𝕒𝕟𝕕 𝕡𝕒𝕡𝕖𝕣𝕤. I feature Stampin’ Up! products in my crafting and creating. Should you need a specific item, links to my online store and select items are provided below. Products are current at time of posting. For similar or additional supplies please visit lisasalkeld.stampinup.net >𝕤𝕙𝕠𝕡 𝕟𝕠𝕨
𝐿𝒾𝓈𝒶 ⎹ Maker + Papercrafter Specializing in handmade greeting cards Join me for step-by-step instruction through all the creative folds, techniques, and tutorials Stampin’ Up! Demonstrator 15 years ⎹ $100,000 SALES ACHIEVER Lifetime Crafter 𝐵𝓁❀𝑔: https://stampyandscrappy.blogspot.com Shop 24▸7: https://lisasalkeld.stampinup.net Oklahoma Stamp Club: https://www.facebook.com/okstampclub Email: lisasalkeld@gmail.com
|


Comments
Post a Comment
It's awesome you're here. Thank you for visiting Stampy and Scrappy! (✿◠‿◠)❤