JAN Project Shares*
Painting Wishes
Printables for January Project Shares, including Painted Wishes and the Bee Mine Sweet Collection are available here: Project Shares
𝐸𝓋𝑒𝓇𝓎 𝒸𝒶𝓃𝓋𝒶𝓈 𝒾𝓈 𝒶 𝒿𝑜𝓊𝓇𝓃𝑒𝓎 𝑜𝓃 𝒾𝓉𝓈 𝑜𝓌𝓃~
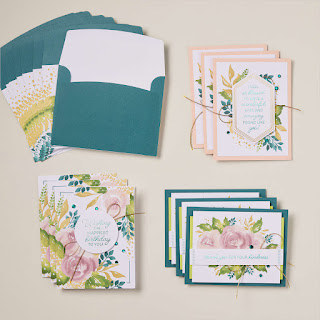
Rich in watercolor designs, colorful florals, and heartfelt greetings, this kit includes supplies for nine greeting cards. Of course, with your creativity, the possibilities are infinite 🌸
Let's use this kit with a twist, we'll create two cards....
No. 1 Stippled Wishes
https://stampyandscrappy.blogspot.com
Finished card is 4-1/4 x 5-1/2
First, we will make a card that incorporates the Softly Stippled design papers.
What you'll need
Stamp: ~
Paper: [kit] Painted Wishes [design papers] Softly Stippled 162975 [card stock] Wild Wheat, white
Ink: ~
Et cetera: ~
Surplus❀
Color Coordination: card stock and papers:
Garden Green, Lemon Lime Twist, Moody Mauve, Petal Pink, Pretty Peacock, Wild Wheat
Measurements and instructions
Card blank: Select from your kit
(1) Card panel from kit and (1) design paper: 3-7/8 x 5-1/8
Card stock center strip: 3-7/8 x 3/4
Sentiment panel: Select from your kit
Inside writing panel, white card stock: 4 x 5-1/4
✦Cutting
Use a card blank from the kit selection.
For the panel, use one panel from the kit and one piece of coordinating design paper, both cut to 3-7/8 x 5-1/8.
Next, cut each of these panels into two pieces, one measuring 3-7/8 x 2-3/8 and the other 3-7/8 x 2-3/4. You will have four pieces altogether.
Choose two contrasting pieces for your card front and set the remaining two aside. They are not needed.
You will also need a strip of card stock to cover the seam of the panels,
3/4 (your choice) x 3-7/8
✦Assembly
First, carefully tape your panels together so they appear as one. Add glue and attach to your card blank.
Next, add glue to your strip of cardstock and attach to card front covering the seam in the panel.
For the sentiment, choose selections from the kit. Four languages are available per greeting. Keeping your preferred language on the top, glue all four sentiment punch outs together into one stack. Glue to your card front. If desired, set a clear block or your phone over the sentiment to ensure it adheres flat, especially if placed over the card stock strip.
Add sparkle with the provided embellishments.
For an extra finishing touch, wrap some of the gold twine around the folded edge of your card and tie a simple knot.
Don’t forget your writing panel on the inside and your card is complete!
Twinkle Tip✧
Kits are perfect for any crafter who wants quick and easy projects that are a cinch to put together and allow us to get on with other projects and tasks. All-inclusive project kits have everything you need in one box easy to create, easy to replicate.
ℂ𝕣𝕖𝕒𝕥𝕖 𝕥𝕙𝕖𝕤𝕖 𝕡𝕣𝕠𝕛𝕖𝕔𝕥 𝕤𝕙𝕒𝕣𝕖𝕤 𝕨𝕚𝕥𝕙 𝕪𝕠𝕦𝕣 𝕗𝕒𝕧𝕠𝕣𝕚𝕥𝕖 𝕤𝕥𝕒𝕞𝕡𝕤, 𝕕𝕚𝕖𝕤, 𝕒𝕟𝕕 𝕡𝕒𝕡𝕖𝕣𝕤. I feature Stampin’ Up! products in my crafting and creating. Should you need a specific item, links to my online store and select items are provided below. Products are current at time of posting. For similar or additional supplies please visit 𝕝𝕚𝕤𝕒𝕤𝕒𝕝𝕜𝕖𝕝𝕕.𝕤𝕥𝕒𝕞𝕡𝕚𝕟𝕦𝕡.𝕟𝕖𝕥 >𝕤𝕙𝕠𝕡 𝕟𝕠𝕨
Kit - Painted Wishes
https://www.stampinup.com/products/painted-wishes-kit?dbwsdemoid=2048063
Bonus papers – Softly Stippled
Available January 4, 2024
No. 2 Petal Pink and Florals
https://stampyandscrappy.blogspot.com
Finished card it 5-1/2 x 4-1/4
What you'll need
Stamp: ~
Paper: [kit] Painted Wishes
Ink: ~
Et cetera: ~
Surplus❀
Color Coordination: card stock and papers:
Garden Green, Lemon Lime Twist, Moody Mauve, Petal Pink, Pretty Peacock, Wild Wheat
Measurements and instructions
All pieces are from your kit -
Card blank: Petal Pink
Panel: LemonLime Twist
Panel: Watercolor floral
Sentiment strip
Sequins and gold trim
Card assembly
Bottom to top and centered on the card front:
🌸card blank
🌸LemonLime Twist panel
🌸floral panel
🌸sentiment stack with preferred language as top layer
Add sequins and gold trim as desired
Twinkle Tip✧
Stacking elements adds dimension to your designs. Simply adhere a few of the same shapes into a stack and attach to your card front. Stacking the sentiment element creates a stand-out greeting!
ℂ𝕣𝕖𝕒𝕥𝕖 𝕥𝕙𝕖𝕤𝕖 𝕡𝕣𝕠𝕛𝕖𝕔𝕥 𝕤𝕙𝕒𝕣𝕖𝕤 𝕨𝕚𝕥𝕙 𝕪𝕠𝕦𝕣 𝕗𝕒𝕧𝕠𝕣𝕚𝕥𝕖 𝕤𝕥𝕒𝕞𝕡𝕤, 𝕕𝕚𝕖𝕤, 𝕒𝕟𝕕 𝕡𝕒𝕡𝕖𝕣𝕤. I feature Stampin’ Up! products in my crafting and creating. Should you need a specific item, links to my online store and select items are provided below. Products are current at time of posting. For similar or additional supplies please visit lisasalkeld.stampinup.net >𝕤𝕙𝕠𝕡 𝕟𝕠𝕨
Kit – Painted Wishes
https://www.stampinup.com/products/painted-wishes-kit?dbwsdemoid=2048063
-Lisa (✿◠‿◠)
𝐿𝒾𝓈𝒶 ⎹ Maker + Papercrafter
Specializing in handmade greeting cards
Join me for step-by-step instruction through all the
creative folds, techniques, and tutorials
Stampin’ Up! Demonstrator 14 years ⎹ $100,000 SALES ACHIEVER
Lifetime Crafter
𝐵𝓁❀𝑔: https://stampyandscrappy.blogspot.com
Shop 24▸7: https://lisasalkeld.stampinup.net
Oklahoma Stamp Club: https://www.facebook.com/okstampclub
Email: lisasalkeld@gmail.com
𝚌𝚛𝚎𝚊𝚝𝚎 𝚝𝚘𝚍𝚊𝚢 (っ◔◡◔)っ✨


Comments
Post a Comment
It's awesome you're here. Thank you for visiting Stampy and Scrappy! (✿◠‿◠)❤