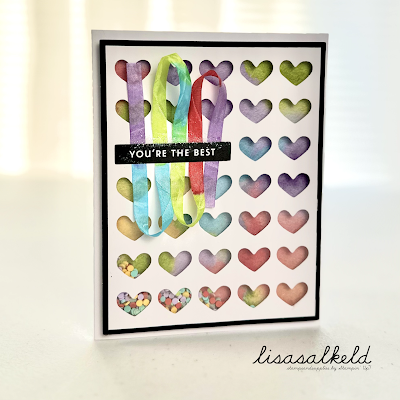
Rainbow Shaker*
February 2023
Rainbow Shaker*
https://stampyandscrappy.blogspot.com
Finished A2 card is 4-1/4 X 5-1/2
create today (✿◠‿◠)✧
Supplies to create this quick shaker card
Stamps ❀
Paper: [kit] Saying Thanks 162361
Ink: Blends alcohol markers, see colors below
Et cetera: foam adhesive strips, tear and tape, window sheets, seam binding ribbon in white
Surplus: shaker assortment mix (sequins, glitter, sprinkles, etc)
Blends colors: ❏Sweet Sorbet ❏Parakeet Party ❏Balmy Blue ❏Highland Heather
Twinkle Tip✧
Shaker assortment mixes are fun to make! You can use anything from sequins, glitter, sprinkles, beads, or even small die cut shapes. When adding shaker mix to your card, mix in a pinch glitter to help the shaker mix move around smoothly.
Happy Stamping! -Lisa
Tutorial in Focus
DIY Rainbow Shaker Card
with Lisa Salkeld
Follow my easy step-by-step guide to make your own shaker card with the Saying Thanks kit by Stampin’ Up!
✦Shaker- You can use window sheets (like acetate, or transparency sheets) and sticky foam strips to create your peek-through shaker element. Today I will use the precut heart panel from the kit, along with window sheets and foam strips (1/8 thickness) to make my shaker element.
First, find the heart panel in your kit. Push out any of the heart shapes that may still be in the precut panel. The heart-shaped pieces are not needed, set them aside or discard them.
Cut a window sheet slightly smaller than the heart panel. The panel is approximately 4 x 5-1/8, so your window sheet should be approximately 3-7/8 x 5.
Use tear and tape to adhere the window sheet to the back of the heart panel. The heart panel should still be flat, but have two layers, the panel and the window sheet.
Next, adhere foam adhesive strips around the edge of the back of the heart panel, on top of the window sheet layer. Make sure the foam tape is not visible from the front of the card. The heart panel now has dimension.
Choose a card base from the kit. Open it flat, right-side up. Add a small pile of your shaker assortment mix to the center of the front of the card.
From the heart panel, remove the paper layer from the foam tape. Carefully adhere the heart panel to the front of the card. Run your finger over the edges of the card to make sure the foam strips completely adhere to the card panel. Give it a little shake to make sure your shaker bits stay inside the peek-through shaker element.
Your shaker card base is complete.
✦Ribbon
For a coordinating ribbon, use alcohol markers to add color to the white seam binding ribbon. For this card I used Sweet Sorbet, Parakeet Party, Balmy Blue, and Highland Heather markers. Use the brush tip to quickly add color to your ribbon, alternating between colors, until your rainbow ribbon is complete.
On the front of the card, where you want to place your ribbon, use your snail, or tape runner, to add a bit of sticky. Keep the sticky area narrow so the sentiment will cover any area still showing after you add your ribbon. Lay your ribbon over the sticky area in a winding pattern. You may need to move it around a bit until you are happy.
Choose a sentiment strip from the kit and adhere it with wet glue over top of the ribbon.
✦Embellishments
Add a few embellishments to the card front. Find the iridescent diamond sequins in your kit.
Your Rainbow Shaker is complete.
Shake, shake, shake!
Lisa ⎹ Maker + Papercrafter
Specializing in handmade greeting cards
Join me for step-by-step instruction through all the
creative folds, techniques, and tutorials
Stampin’ Up! Demonstrator 14 years ⎹ Lifetime crafter
create today (◡‿◡✧)
Blog: https://stampyandscrappy.blogspot.com
Shop 24-7: https://lisasalkeld.stampinup.net
Need anything to make your shaker card? Here is what I used….
Saying Thanks Kit 162361 $13
https://www.stampinup.com/products/saying-thanks-kit?dbwsdemoid=2048063
Foam Adhesive Strips 141825 $8
https://www.stampinup.com/products/adhesive-foam-strips?dbwsdemoid=2048063
Tear & Tape 154031 $7
https://www.stampinup.com/products/tear-tape-adhesive?dbwsdemoid=2048063
Window Sheets 142314 $5
https://www.stampinup.com/products/window-sheets?dbwsdemoid=2048063
White Crinkled Seam Binding Ribbon 151326 $7.50
Stampin’ Blends alcohol markers help you create highlights and shadows for a dimensional coloring effect
Sweet Sorbet
https://www.stampinup.com/products/sweet-sorbet-stampin-blends-combo-pack?dbwsdemoid=2048063
Parakeet Party
https://www.stampinup.com/products/parakeet-party-stampin-blends-combo-pack?dbwsdemoid=2048063
Balmy Blue
https://www.stampinup.com/products/balmy-blue-stampin-blends-combo-pack?dbwsdemoid=2048063
Highland Heather
https://www.stampinup.com/products/highland-heather-stampin-blends-combo-pack?dbwsdemoid=2048063
Let’s shake things up a bit, here’s a peek at some of my other shaker cards -
For an unexpected twist, change out the acetate for tulle :)
✧Create what you wish existed✧
Lisa⎹ Maker + Papercrafter
Specializing in handmade greeting cards
Join me for step-by-step instruction through all the
creative folds, techniques, and tutorials
Stampin’ Up! Demonstrator 14 years⎹ Lifetime crafter
create today (◡‿◡✧)
Blog: https://stampyandscrappy.blogspot.com
Shop 24-7: https://lisasalkeld.stampinup.net
Email: lisasalkeld@gmail.com


Comments
Post a Comment
It's awesome you're here. Thank you for visiting Stampy and Scrappy! (✿◠‿◠)❤